NURBS is a way to do smooth curves on CNC, but it is really important or not?
What is the drawback of using NURBS? This site has more info about NURBS technology:
http://americanmachinist.com/cadcam-software/does-nurbs-miss-point
Month: July 2014
How to make the perfect PCB
Few weeks ago I posted a listing of sites with nice tips to let you develop your PCB at home:
https://acassis.wordpress.com/2014/07/15/tips-to-do-home-made-pcb-boards/
Today I found this nice tip from Michael Leonard explaining what is a PCB and some EDA design tips, guidelines and best practices. I suggest this reading for everybody who needs to know more about PCB design:
http://www.michaelhleonard.com/how-to-design-the-perfect-pcb-part1
http://www.michaelhleonard.com/how-to-design-the-perfect-pcb-part2
While writing this post about Michael’s tips I remembered of these very complete and detailed (and long) posts from a Mentor Graphics:
http://blogs.mentor.com/tom-hausherr/blog/2010/07/08/metric-vs-imperial-measurement-systems/
Sites com dicas interessantes sobre reconstrução 3D
Open Source Photogrammetry: Ditching 123D Catch
Turning Photographs into Wireframes, VisualSFM on CentOS6
Exploring Aerial Photogrammetry using Bundler and Meshlab
Video Tutorial on using VisualSFM and Meshlabs to create a 3d model from photos of a Lingerie model
Site com dicas interessantes sobre reconstrução 3D usando usando fotos tiradas por UAV:
http://flightriot.com
Instalando o VisualSFM no Linux Mint 17
Encontrei dois sites interessantes sobre o uso do software VisualSFM para reconstrução de objetos em 3D (Scanner 3D) usando apenas fotos de vários ângulos do objeto desejado.
Neste site você encontra o passo-a-passo de como usar o software:
http://wedidstuff.heavyimage.com/index.php/2013/07/12/open-source-photogrammetry-workflow/
O detalhe é que este software não é muito simples de instalar, mas felizmente existe um tutorial bem explicativo:
http://www.10flow.com/2012/08/15/building-visualsfm-on-ubuntu-12-04-precise-pangolin-desktop-64-bit/
Durante a compilação tive que instalar várias dependências para finalizar corretamente.
O comando “history” ajuda na hora de documentar quais pacotes você deve instalar:
sudo apt-get install libjpeg62
sudo apt-get install libgtkgl2.0-dev
sudo apt-get install libglu1-mesa-dev
sudo apt-get install libc6-dev-i386 libhdf5-serial-dev libgtest-dev libgsl0-dev python-dev cmake imagemagick libmagick++-dev gfortran minpack-dev liblapack-dev libatlas-dev libatlas-base-dev libboost-dev libc6-dev-i386 libgsl0-dev
sudo apt-get install libglew-dev
sudo apt-get install libilmbase-dev
sudo apt-get install freeglut3 freeglut3-dev
sudo apt-get install libdevil1c2 libdevil-dev
sudo apt-get install linux-libc-dev
sudo apt-get install nvidia-cuda-dev
sudo apt-get install nvidia-cuda-toolkit
Esta foi a ordem de instalação dos pacotes, mas claro que você pode juntar todos os comandos acima num único comando.
Quando terminar a compilação e você adicionar os comandos no seu .bashrc (PATH e LD_LIBRARY_PATH para que o VisualSFM funcione de qualquer lugar que for chamado), basta seguir o tutorial do primeiro link e executar o comando:
$ VisualSFM
Este é o log que o programa exibiu no terminal durante o processo de reconstrução 3D:
$ VisualSFM
ERROR: CUDA is unlikely to be supported!
CPU single-precisoin solver; 4 cores.
CPU single-precisoin solver; 4 cores.
WARNING: 78 points are behind camras.
WARNING: 5 points are behind camras.
WARNING: 12 points are behind camras.
WARNING: 1 camera moved to avoid degeneracy.
WARNING: 103 points are behind camras.
WARNING: 1 camera moved to avoid degeneracy.
WARNING: 53 points are behind camras.
WARNING: 150 points are behind camras.
WARNING: 50 points are behind camras.
WARNING: 8 points are behind camras.
WARNING: 2 points are behind camras.
WARNING: 1 camera moved to avoid degeneracy.
WARNING: 4 points are behind camras.
WARNING: 50 points are behind camras.
WARNING: 105 points are behind camras.
WARNING: 1 camera moved to avoid degeneracy.
WARNING: 14 points are behind camras.
WARNING: 9 points are behind camras.
Reading bundle...23 cameras -- 11366 points in bundle file
***********
23 cameras -- 11366 points
Reading images: ***********************
Set widths/heights...done	0 secs
done	0 secs
slimNeighborsSetLinks...done	0 secs
mergeSFM...***********resetPoints...done
Rep counts: 11366 -> 1506  	1 secs
setScoreThresholds...done	0 secs
sRemoveImages... ************
Kept: 1 2 4 5 6 7 8 9 10 11 12 13 14 15 16 17 19 20

Removed: 0 3 18 21 22
sRemoveImages: 23 -> 18	0 secs
slimNeighborsSetLinks...done	0 secs
Cluster sizes:
18
Adding images:
0
Image nums: 23 -> 18 -> 18
Divide:
done	0 secs
17 images in vis on the average
--------------------------------------------------
--- Summary of specified options ---
# of timages: 18 (enumeration)
# of oimages: 0 (enumeration)
level: 1  csize: 2
threshold: 0  wsize: 7
minImageNum: 3  CPU: 4
useVisData: 1  sequence: -1
--------------------------------------------------
Reading images: ******************
1 2 4 5 Harris running ...Harris running ...Harris running ...Harris running ...7867 harris done
DoG running...7524 harris done
DoG running...7780 harris done
DoG running...7660 harris done
DoG running...11841 dog done
11453 dog done
6 Harris running ...7 Harris running ...11371 dog done
8 Harris running ...11590 dog done
9 Harris running ...7937 harris done
7873 harris done
DoG running...DoG running...7859 harris done
DoG running...7888 harris done
DoG running...11831 dog done
10 Harris running ...11814 dog done
11 Harris running ...11796 dog done
12 Harris running ...11569 dog done
13 Harris running ...7810 harris done
DoG running...7867 harris done
DoG running...7885 harris done
DoG running...7976 harris done
DoG running...11664 dog done
14 Harris running ...11555 dog done
15 Harris running ...11503 dog done
16 Harris running ...11492 dog done
17 Harris running ...7889 harris done
DoG running...7937 harris done
DoG running...8039 harris done
DoG running...7674 harris done
DoG running...11815 dog done
19 Harris running ...11658 dog done
20 Harris running ...11534 dog done
11786 dog done
7956 harris done
DoG running...7812 harris done
DoG running...11619 dog done
11648 dog done
done
adding seeds
(4,14112)(15,14826)(11,11580)(10,17663)(16,6016)(14,8447)(6,1015)(3,0)(7,0)(8,0)(2,5)(9,303)(12,302)(0,1446)(5,234)(13,7)(17,3265)(1,4141)done
---- Initial: 0 secs ----
Total pass fail0 fail1 refinepatch: 420784 160226 234044 26514 186740
Total pass fail0 fail1 refinepatch: 100 38.078 55.6209 6.3011 44.3791
Expanding patches...
---- EXPANSION: 3623 secs ----
Total pass fail0 fail1 refinepatch: 1870144 1707366 90931 71847 1779213
Total pass fail0 fail1 refinepatch: 100 91.296 4.86225 3.84179 95.1377
FilterOutside
mainbody:
Gain (ave/var): 3.43597 4.34296
1790691 -> 1400840 (78.229%)	0 secs
Filter Exact: ******************
1400840 -> 1069251 (76.3293%)	0 secs
FilterNeighbor:	1069251 -> 861199 (80.5423%)	0 secs
FilterGroups:	86
861199 -> 731982 (84.9957%)	0 secs
STATUS: 63493 0 1902422 0 0 0 0 0 0 0
0 0 0 0 0 0 0 0 0 0
0 0 0 0 0 0 0 0 0 0
0 0 0 0 0
Expanding patches...
---- EXPANSION: 6473 secs ----
Total pass fail0 fail1 refinepatch: 1614281 809529 225725 579027 1388556
Total pass fail0 fail1 refinepatch: 100 50.148 13.983 35.869 86.017
FilterOutside
mainbody:
Gain (ave/var): 4.72691 4.08953
1541511 -> 1495754 (97.0317%)	0 secs
Filter Exact: ******************
1495754 -> 1089231 (72.8215%)	0 secs
FilterNeighbor:	1089231 -> 1005671 (92.3285%)	0 secs
FilterGroups:	100
1005671 -> 910438 (90.5304%)	0 secs
STATUS: 107343 0 3247058 0 0 0 0 0 0 0
0 0 0 0 0 0 0 0 0 0
0 0 0 0 0 0 0 0 0 0
0 0 0 0 0
Expanding patches...
---- EXPANSION: 7093 secs ----
Total pass fail0 fail1 refinepatch: 1477285 717982 219394 539909 1257891
Total pass fail0 fail1 refinepatch: 100 48.6015 14.8512 36.5474 85.1488
FilterOutside
mainbody:
Gain (ave/var): 4.80507 4.23908
1628420 -> 1578352 (96.9254%)	0 secs
Filter Exact: ******************
1578352 -> 1134779 (71.8964%)	0 secs
FilterNeighbor:	1134779 -> 1058326 (93.2627%)	0 secs
FilterGroups:	105
1058326 -> 962984 (90.9912%)	0 secs
STATUS: 148417 0 4463834 0 0 0 0 0 0 0
0 0 0 0 0 0 0 0 0 0
0 0 0 0 0 0 0 0 0 0
0 0 0 0 0
Observe no log acima que a primeira “EXPANSION” demorou quase 1 hora e as duas seguintes demoraram quase 2 horas cada.
Eu comecei os testes no início da tarde de ontem e deixei o computador ligado a noite terminando a conversão. A última vez que olhei há quanto tempo o programa VisualSFM estava rodando (usando o etime do comando ps) já havia se passado 10 horas.
É importante lembrar que usei um notebook modesto: Intel® Core™ i3-3227U (1.9GHz, 4 Threads, 3Mb Cache, Placa de vídeo Intel HD Graphics) sem suporte a CUDA. Vou refazer o teste usando o outro notebook que tem uma configuração um pouco melhor (Core i7 com placa de vídeo NVIDIA e com suporte CUDA) para ver se o tempo de processamento diminuirá muito.
Seguem abaixo alguns screenshots e alguns comentários:
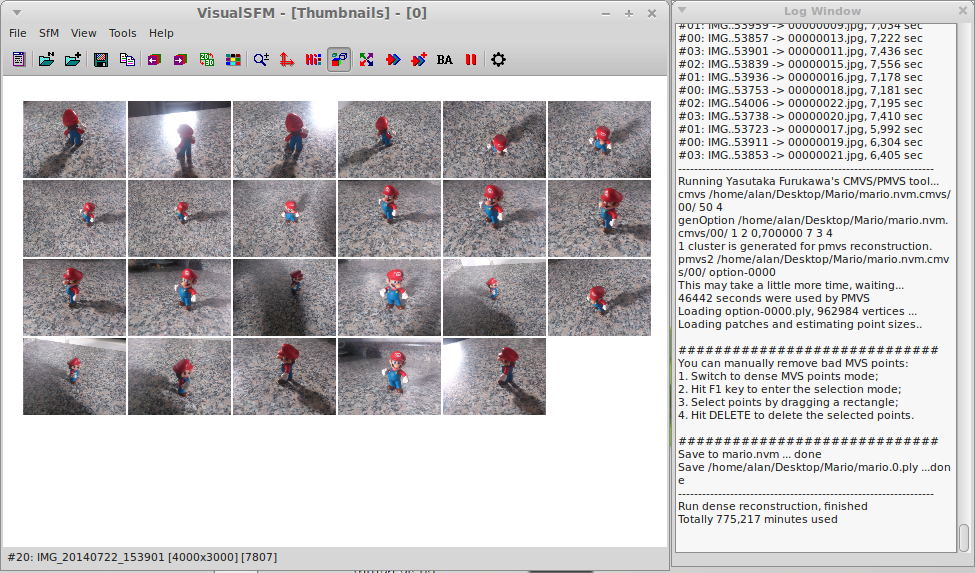
Neste primeiro teste eu não preocupei com alguns detalhes: número reduzido de fotos para processamento (23 fotos); nem todos os lados do objeto foram fotografados suficientemente, note nas fotos acima que o lado esquerdo do Mario foi fotografado aprox. 10 fotos, enquando o lado direito e traseiro foram muito pouco fotografados; não preocupei em corrigir os avisos de advertência do software sobre a posição da camera, etc.
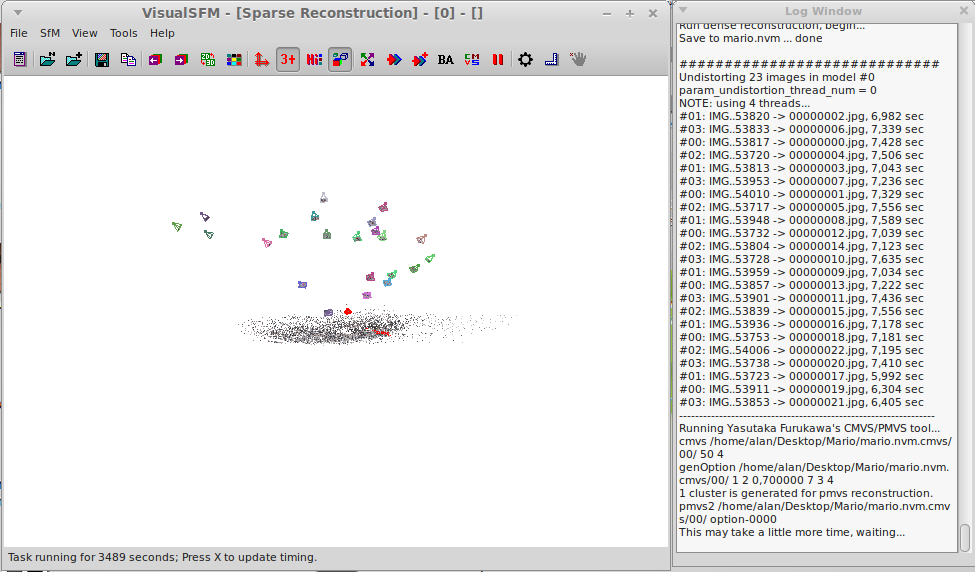
Após rodar o comando para computar os pontos que estão faltando e computar a reconstrução 3D o programa gera um nuvem de pontos com as informações colhidas das fotos:
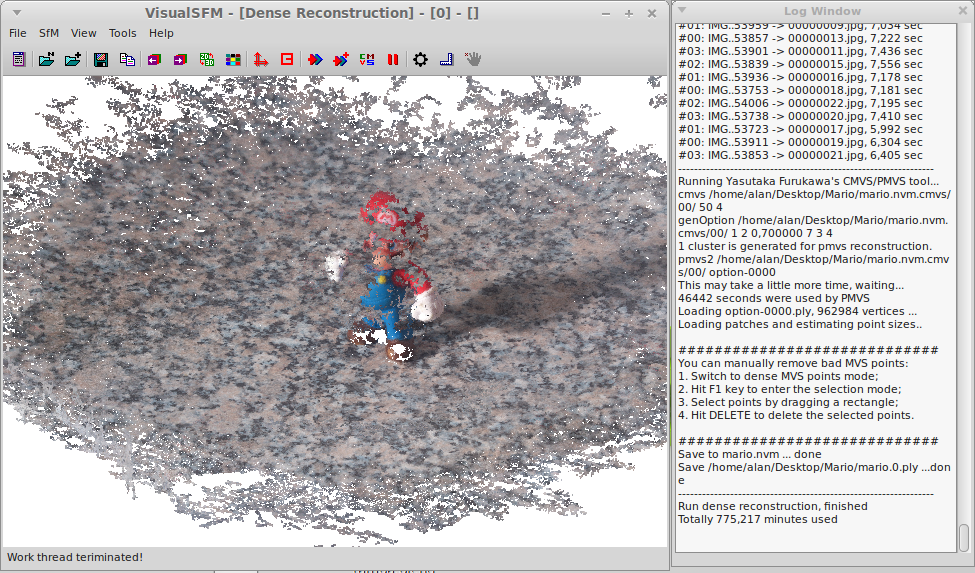
E finalmente o resultado de aproximadamente 15 horas de processamento após executar o “Dense Reconstruction” (botão CMVS) :
Para alternar entre o modo visualização 3D e nuvem de pontos basta pressionar a tecla TAB.
Apesar do resultado inicial não ser o eu esperava, fiquei surpreso com o nível de detalhes da parte reconstruída, já que o boneco Mario usado neste teste era muito pequeno, aprox. 4cm de altura.
Para um resultado melhor seria interessante usar uma plataforma giratória onde o objeto seria fixado e as fotos seriam tiradas em ângulos bem definidos. Nesta plataforma a altura da camera seria reajustada após obter as fotos de 360º do objeto.
How I bricked and unbricked my Xperia S after flashing kernel
I was testing my Xperia S with images from CyanogenMOD and OpenSEMC projects, then after flashing this kernel:
# fastboot flash boot OpenSEMC-kk-beta2-oldmapping-boot.img
sending 'boot' (9223 KB)...
(bootloader) USB download speed was 36326kB/s
OKAY [  0.275s]
writing 'boot'...
(bootloader) Flash of partition 'boot' requested
(bootloader) S1 partID 0x00000003, block 0x00002000-0x0000bfff
(bootloader) Erase operation complete, 0 bad blocks encountered
(bootloader) Flashing...
(bootloader) Flash operation complete
OKAY [  1.727s]
finished. total time: 2.002s
And this combination of files:
OpenSEMC-kk-beta2.zip
pa_gapps-stock-4.4.2-20131230-signed.zip
My device didn’t started anymore, all I see was a black screen.
I was following the instructions from this page:
http://www.androidhogger.com/how-to-install-cyanogenmod-11-android-4-4-xperia-s.html
Then after searching how to unbrick a Xperia S I found this thread:
http://forum.xda-developers.com/showthread.php?t=2088525
Then tested the hard-reset: VOLUME_DOWN + VOLUME_UP + POWER. I feel the vibration of phone starting but after plugin the USB cable nothing is recognized. Trying this hard-reset with USB cable plugged didn’t work. I removed the cable from computer and as fast as I could pluged it back after hard-reset and saw this using $ dmesg command:
[ 3974.182383] usb 3-1: new high-speed USB device number 15 using xhci_hcd
[ 3974.199391] usb 3-1: New USB device found, idVendor=0fce, idProduct=3dde
[ 3974.199403] usb 3-1: New USB device strings: Mfr=1, Product=2, SerialNumber=0
[ 3974.199408] usb 3-1: Product: QHSUSB_DLOAD
[ 3974.199413] usb 3-1: Manufacturer: Qualcomm CDMA Technologies MSM
[ 3977.466235] usb 3-1: USB disconnect, device number 15
[ 3977.825237] usb 3-1: new high-speed USB device number 16 using xhci_hcd
[ 3977.842089] usb 3-1: New USB device found, idVendor=0fce, idProduct=3dde
[ 3977.842110] usb 3-1: New USB device strings: Mfr=1, Product=2, SerialNumber=0
[ 3977.842121] usb 3-1: Product: QHSUSB_DLOAD
[ 3977.842130] usb 3-1: Manufacturer: Qualcomm CDMA Technologies MSM
[ 3981.107036] usb 3-1: USB disconnect, device number 16
[ 3981.468040] usb 3-1: new high-speed USB device number 17 using xhci_hcd
[ 3981.484920] usb 3-1: New USB device found, idVendor=0fce, idProduct=3dde
[ 3981.484931] usb 3-1: New USB device strings: Mfr=1, Product=2, SerialNumber=0
[ 3981.484936] usb 3-1: Product: QHSUSB_DLOAD
[ 3981.484941] usb 3-1: Manufacturer: Qualcomm CDMA Technologies MSM
[ 3984.927213] usb 3-1: USB disconnect, device number 17
Then I decide to test another approach: hard-reset and execute fastboot command to flash a known kernel:
# fastboot flash boot S_DooMLoRD_AdvStkKernel_FW-96_v3.elf

sending 'boot' (9244 KB)...
(bootloader) USB download speed was 36408kB/s
OKAY [  0.275s]
writing 'boot'...
(bootloader) Flash of partition 'boot' requested
(bootloader) S1 partID 0x00000003, block 0x00002000-0x0000bfff
(bootloader) Erase operation complete, 0 bad blocks encountered
(bootloader) Flashing...
(bootloader) Flash operation complete
OKAY [  2.291s]
finished. total time: 2.567s
Great it worked and I can use ClockWorkMod again to flash a good Android version.
Testing Vehicle Tracking Goome GM901
Send: param#
Receive: SN:684614030521034
APN: claro.com.br
IP: gm901.szdatasource.com:8841
CENTER TEL:0
TIMER:0
TimeZone:8.0
LANGUAGE:EN
LCWL:OFF
ATWL:OFF
Send: version#
Receive: MTRACK SOFTWARE VERSION
P60_B1.1_VBP6.0.3
Reinstalling CyanogenMod 10 on Xperia S
First I installed the Clock Work Mod (CWM), it was easy I just follow this page:
http://forum.xda-developers.com/showthread.php?t=2302393
$ adb reboot bootloader

$ sudo -s

# fastboot flash boot S_DooMLoRD_AdvStkKernel_FW-96_v3.elf

sending 'boot' (9244 KB)...
(bootloader) USB download speed was 36833kB/s
OKAY [  0.272s]
writing 'boot'...
(bootloader) Flash of partition 'boot' requested
(bootloader) S1 partID 0x00000003, block 0x00002000-0x0000bfff
(bootloader) Erase operation complete, 0 bad blocks encountered
(bootloader) Flashing...
(bootloader) Flash operation complete
OKAY [  1.831s]
finished. total time: 2.104s
Then I restarted the phone keep pressing VOLUME_UP to enter on CWM recovery mode.
In CWM menu I cleared data/cache (factory reset) and installed these files:
cm-10-20131224-FXP-nozomi.zip
gapps-jb-20121011-signed.zip
Update: I use rVoix calling recorder program and this is the configuration that worked for my Xperia S:
Android version: 4.1.2
Kernel version: 3.0.58-FXP+ (Sat Jan 19 23:15:35 EET 2013)
CyanogenMod version: 10-20130119-UNOFFICIAL-nozomi
Version Number:
cm_nozomi-userdebug 4.1.2 JZO54K eng.
root.20130119.230737 test-keys
This is rVoix version I’m using: rvoix_mod_kaefert_v2.apk !
A strange thing I noticed: rVoix doesn’t work the first time I run it, after restarting the Android the rvoix service starts but the icon doesn’t appear in the notification area and the audio format selected (MP3/AMR) is ignored and it always save only WAV files.
A no-ip and dyndns client for Linux
I was looking for a nice dynamic ip client to use with noip.com and found this one:
inadyn - Simple and small DynDNS client written in the C language
Then you need to edit /etc/inadyn.conf and modify some parameters:
$ sudo vi /etc/inadyn.conf

...
# Please see inadyn(8) for a complete list of providers
system default@no-ip.com #(read /usr/share/doc/inadyn/README.md for dyndns example)

# Your username
username your-noip.com-username

# Your password
password your-noip.com-password

# Your hostname. This option can appear multiple times
alias your-noip.com-hostname (i.e.: yourname.no-ip.org)
Also edit /etc/default/inadyn and change RUN_DAEMON to:
RUN_DAEMON="yes"
Finally create a symbolic link (I know, but I don’t like to use that command) to start the daemon:
$ cd /etc/rc2.d/
$ sudo ln -s /etc/init.d/inadyn S40inadyn
Then execute the command to start the daemon right now:
$ sudo /etc/init.d/inadyn start
Update: There is also the native noip2 client: http://www.noip.com/support/knowledgebase/installing-the-linux-dynamic-update-client/ A step-by-step installation is showed here:
http://www.howtoforge.com/how-to-install-no-ip2-on-ubuntu-12.04-lts-in-order-to-host-servers-on-a-dynamic-ip-address
A Fast and Small alternative to JSON
If your application needs to transfer data over Internet using some mobile device connected to GSM network, then using JSON or other text serializer is not a good solution. It is better to use a binary serializer.
Searching for alternatives I found MessagePack: http://msgpack.org
There are other alternatives like Google’s BufferProtocol, but it is not so efficient as MessagePack.
You can find a listing with many alternatives in the wikipedia:
http://en.wikipedia.org/wiki/Comparison_of_data_serialization_formats
Tips to do home-made PCB boards
This is a listing of many sites with nice tips about how to do your PCB board:
This link show how to create a PCB board with industrial-like quality:
http://www.homediystuff.com/etching-diy-pcb-printed-circuitt-boards/
Tips for toner transfer method for PCB home manufacturing:
http://acidbourbon.wordpress.com/2014/04/05/pcbtips/
Many useful tips, from good PCB design suggestion to etching material to use:
http://www.electricstuff.co.uk/pcbs.html
Direct PCB printing:
http://www.pabr.org/pcbprt/pcbprt.en.html
Another site about Direct PCB printing:
http://techref.massmind.org/techref/pcb/etch/directinkjetresist.htm
