Month: January 2020

Testing QDBM: Quick Database Manager

The QDBM is a small database manager that could be used for embedded systems (just pay attention on its license: LGPL, so only dynamic linkage if you are using it for commercial applications).

Fortunately the documentation of the project is very good:

https://fallabs.com/qdbm/

The most basic example is demonstrated on project documentation:

#include <depot.h>
#include <stdlib.h>
#include <stdio.h>

#define NAME     "mikio"
#define NUMBER   "000-1234-5678"
#define DBNAME   "book"

int main(int argc, char **argv){
  DEPOT *depot;
  char *val;

  /* open the database */
  if(!(depot = dpopen(DBNAME, DP_OWRITER | DP_OCREAT, -1))){
    fprintf(stderr, "dpopen: %s\n", dperrmsg(dpecode));
    return 1;
  }

  /* store the record */
  if(!dpput(depot, NAME, -1, NUMBER, -1, DP_DOVER)){
    fprintf(stderr, "dpput: %s\n", dperrmsg(dpecode));
  }

  /* retrieve the record */
  if(!(val = dpget(depot, NAME, -1, 0, -1, NULL))){
    fprintf(stderr, "dpget: %s\n", dperrmsg(dpecode));
  } else {
    printf("Name: %s\n", NAME);
    printf("Number: %s\n", val);
    free(val);
  }

  /* close the database */
  if(!dpclose(depot)){
    fprintf(stderr, "dpclose: %s\n", dperrmsg(dpecode));
    return 1;
  }

  return 0;
}

To compile this example you need to install the libqdbm:

$ sudo apt install libqdbm-dev

Save the above code as phone.c and compile this way:

$ gcc -std=c99 -o phone phone.c $(pkg-config --cflags --libs qdbm)

You can also install the package qdbm-util:

$ sudo apt install qdbm-util

Now you can create the database using this command:

$ dpmgr create mydata.qdbm

To insert data:

$ dpmgr put mydata.qdbm “Joe” “Student”

$ dpmgr put mydata.qdbm “Mary” “Doctor”

$ dpmgr put mydata.qdbm “Julia” “Actress”
RTL-SDR as FM radio on Linux

Although you don’t need GNUradio, it is a good idea to install it and the rtl_sdr wil be installed as well:

$ sudo apt install gnuradio
$ sudo apt install gr-osmosdr

You will need the audio “play” command, it is on sox package:

$ sudo apt install sox

And finally (105.1MHz is Antena1 in Belo Horizonte)

$ rtl_fm -M wbfm -f 105.1M | play -r 32k -t raw -e s -b 16 -c 1 -V1 -

Recovering the iDBM+ after JLink mass erase

Flashing the bootloader:

J-Link>loadbin ./uTaskerSerialLoader_1v0.srec, 0x0
Downloading file [./uTaskerSerialLoader_1v0.srec]…
Comparing flash [100%] Done.
Erasing flash [100%] Done.
Programming flash [100%] Done.
Verifying flash [100%] Done.
J-Link: Flash download: Bank 0 @ 0x00000000: 1 range affected (12288 bytes)
J-Link: Flash download: Total time needed: 0.178s (Prepare: 0.025s, Compare: 0.002s, Erase: 0.007s, Program: 0.138s, Verify: 0.000s, Restore: 0.003s)
O.K.

Flashing the application:

J-Link>loadbin app_idbmplus_1v16.bin, 0x4000
Halting CPU for downloading file.
Downloading file [app_idbmplus_1v16.bin]…
Comparing flash [100%] Done.
Erasing flash [100%] Done.
Programming flash [100%] Done.
Verifying flash [100%] Done.
WARNING: CPU could not be halted
J-Link: Flash download: Bank 0 @ 0x00000000: 1 range affected (278528 bytes)
J-Link: Flash download: Total time needed: 3.056s (Prepare: 0.024s, Compare: 0.020s, Erase: 0.000s, Program: 3.001s, Verify: 0.007s, Restore: 0.001s)
O.K.

Using JLink with NXP MK64FX512VLL12

This is the command:

$ sudo JLinkExe -if swd
SEGGER J-Link Commander V6.46h (Compiled Jun 28 2019 17:19:57)
DLL version V6.46h, compiled Jun 28 2019 17:19:50
Connecting to J-Link via USB…O.K.
Firmware: J-Link ARM V8 compiled Nov 28 2014 13:44:46
Hardware version: V8.00
S/N: 268XXXXXX
License(s): FlashBP, GDB
OEM: SEGGER-EDU
VTref=3.060V
Type "connect" to establish a target connection, '?' for help
J-Link>connect
Please specify device / core. : ATSAML21G18
Type '?' for selection dialog
Device>MK64FX512XXX12
Specify target interface speed [kHz]. : 4000 kHz
Speed>
Device "MK64FX512XXX12" selected.
Connecting to target via SWD
InitTarget()
Protection bytes in flash at addr. 0x400 - 0x40F indicate that readout protection is set.
For debugger connection the device needs to be unsecured.
Note: Unsecuring will trigger a mass erase of the internal flash.
Device will be unsecured now.
Found SW-DP with ID 0x2BA01477
Scanning AP map to find all available APs
AP[2]: Stopped AP scan as end of AP map has been reached
AP[0]: AHB-AP (IDR: 0x24770011)
AP[1]: JTAG-AP (IDR: 0x001C0000)
Iterating through AP map to find AHB-AP to use
AP[0]: Core found
AP[0]: AHB-AP ROM base: 0xE00FF000
CPUID register: 0x410FC241. Implementer code: 0x41 (ARM)
Found Cortex-M4 r0p1, Little endian.
FPUnit: 6 code (BP) slots and 2 literal slots
CoreSight components:
ROMTbl[0] @ E00FF000
ROMTbl[0][0]: E000E000, CID: B105E00D, PID: 000BB00C SCS-M7
ROMTbl[0][1]: E0001000, CID: B105E00D, PID: 003BB002 DWT
ROMTbl[0][2]: E0002000, CID: B105E00D, PID: 002BB003 FPB
ROMTbl[0][3]: E0000000, CID: B105E00D, PID: 003BB001 ITM
ROMTbl[0][4]: E0040000, CID: B105900D, PID: 000BB9A1 TPIU
ROMTbl[0][5]: E0041000, CID: B105900D, PID: 000BB925 ETM
ROMTbl[0][6]: E0042000, CID: B105900D, PID: 003BB907 ETB
ROMTbl[0][7]: E0043000, CID: B105900D, PID: 001BB908 CSTF
Cortex-M4 identified.
J-Link>

Using SSH with github after cloning it as HTTPS

I did a mistake and cloned github as https:

$ git clone https://github.com/apache/incubator-nuttx

Then after trying to submit a commit is was failing to accept my password:

$ git push origin master
Username for 'https://github.com': acassis
Password for 'https://acassis@github.com':
remote: Invalid username or password.

To error was happening because the https is not the right repository to authenticate with your SSH Keys.

After spending some minutes trying to figure out what happend I found the solution:

$ git remote set-url origin git@github.com:apache/incubator-nuttx.git

This command will change the repository URL to use the SSH address.

Nice Bash terminals shortcuts

Today Adam Feuer submitted a NuttX patch to changes NSH command line editing so ctrl-K deletes from char pos to EOL like GNU readline

Besides Ctrl+K you can use many others interesting shortcuts in the Bash:

  • Ctrl + A => move the cursor to the beginning of the command line;
  • Ctrl + L => Clear screen and move the command line to top of the screen;
  • Ctrl + W => Erase the word at left side of the cursor;
  • Ctrl + E => Move the cursor to the end of command line;
  • Ctrl + R => Reserve-i-search: search for a previously typed command line;
  • Ctrl + T => Exchange the left character with the character at right (current position case you are not using the vertical line cursor, see below)
  • Ctrl + U => Erase all characters at the left of the cursor until the beginning of the command file;
  • Ctrl + P => Same as arrow up, show previous command line;
  • Ctrl + F => Same as arrow right, move a position to the right;
  • Ctrl + H => Same as Backspace;
  • Ctrl + K => Erase all characters from current position until the end of the line;
  • Ctrl + Z => Case you are running a command it will make it a zombie and you return to command file. Useful when you don’t know how to close a program and Ctrl + C doesn’t work;
  • Ctrl + B => Same as arrow left, move a position to the left;
  • Ctrl + N => Same as arrow down, show next command line (case you moved to previous command line)
  • Ctrl + C => Case you are running a command, it will send a signal to kill the command;
  • Alt + . => Copy the last word from previous command files

This command will replace the square bar cursor with a vertical line cursor:

$ echo -e -n "\x1b[\x36 q"

If you want to return to previous cursor just type: reset and press enter.

The Old Way NuttX Workflow

These are the steps that Mr. Greg Nutt used to follow to apply a received Pull Request. So this post is basically an extension of the steps that he shared with me. I’m documenting it here because it could be useful for some committer until we get the new NuttX Workflow in place.

  • First review the change. If it looks risky, ask for other,
    appropriate people to review the change too.
  • Wait for other review comments if you have requested them. You may need to ask the contributor to fix certain things and force push an update.
  • When you are satisfied, you can follow these steps.

First you need to clone the nuttx and apps repositories:

$ git clone https://github.com/apache/incubator-nuttx nuttx
$ git clone https://github.com/apache/incubator-apps apps

Enter inside nuttx and create a prXX branch, in this case the XX is the pull request number received at github. Then for pull request #26 it will be pr26.

$ cd nuttx
$ git branch pr26
$ git checkout pr26
$ git push -u origin pr26

This last command submitted your branch to github repository.

Now you can go to the github pull request page (https://github.com/apache/incubator-nuttx/pull/XX where XX is the PR #) and merge it into this new branch.

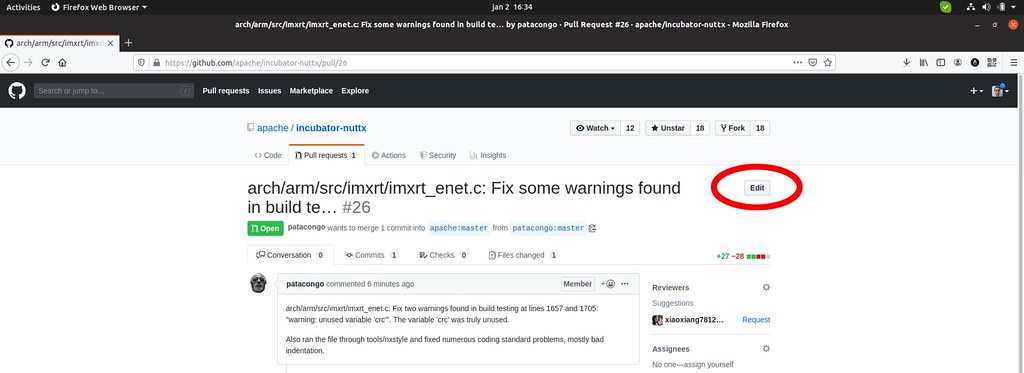
To do it click on Edit button in the top of the page, at right side of the PR name:

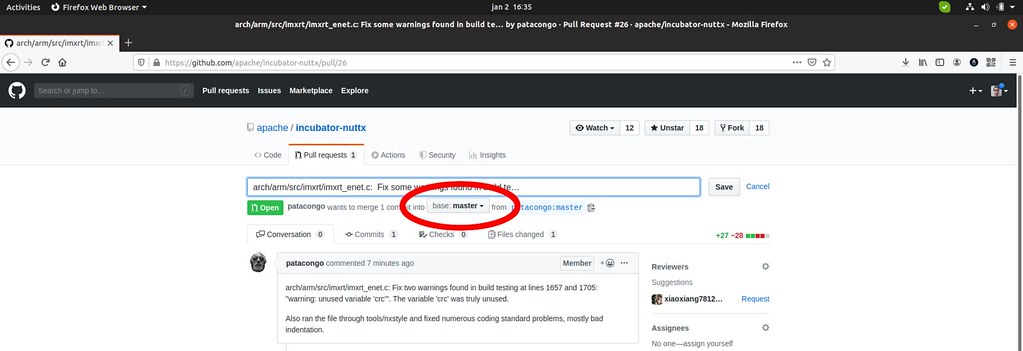
Click on “base:master” below the textbox:

Change it to prXX (i.e. pr26) that you just created:

It will ask if you want to change base, just confirm:

Now scroll to the bottom of the page. You will see a big green “Merge pull request” button. Use the little arrow pull-down and select “Squash and Merge”:

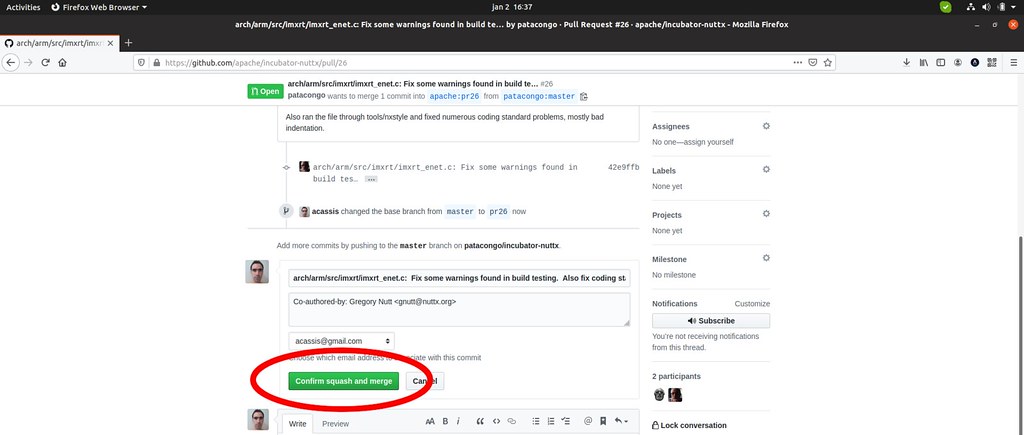
Click on “Squash and Merge” button. It will allow to edit the Pull Request comments. When everything is fine click on “Confirm squash and merge”:

Return to the Linux terminal and update the prXX branch to get the commits from the received Pull Request:

$ git pull origin pr26

At this point you should have all modified files in your local repository. It is time to modify the “review.sh” to include the files to be reviewed.

You can run this command to get the list of the modified files:

$ git show --name-only

Copy these files (only include files with .c and .h extension) to the FILELIST=”\ inside the “review.sh”. Don’t forget to remove the old file names inside this FILELIST variable.

After including the file names inside “review.sh”, save and exist the editor and run this command:

$ ./review.sh

Fix any reported error and run the ./review.sh again until everything is fixed.

When everything is fine you need to add the modified files and amend:

$ git add path/to/modified/file.c
$ git commit --amend

Then return to master branch:

$ git checkout master

Update the master again before doing the merge:

$ git pull --rebase

Now you can commit these modifications, but remember to commit using using the original PR# Author:

$ git commit -a --author="Original Author PR <authorname@hisemail.com"

Remember to edit the commit to make it clear, remove not important field comments, look other commits for reference.

Send these modification to git repository:

$ git push origin master

Finally you can remove the prXX branch, local and from repository:

$ git branch -D pr26
$ git push --delete origin pr26