Few months ago I discovered a low cost board powered by STM32F103C8T6 microcontroller.
That board is referenced as “STM32 Minimum System Development Board” or as “BluePill Board”:
http://www.stm32duino.com/viewtopic.php?t=117
I bought that board from Aliexpress for U$1.96:
http://aliexpress.com/item/STM32F103C8T6-ARM-STM32-Minimum-System-Development-Board-Module-ForArduin/32282374854.html
Then when it arrived I got NuttX running on it and submitted a patch to Mr. Greg to add it to NuttX mainline. Now everybody can get NuttX running on it easily.
This tutorial will explain how to do that, first let me list what you will need:
– The STM32F103C8T6 Minimum board;
– A STLinkV2 programmer (or a low cost clone) ;
– A USB/Serial adapter 3.3V compatible (like this one on ebay);
– A USB to MicroUSB cable, like these used to recharge your smartphone;
– A computer running Linux Debian or Ubuntu (it is possible on Windows using Cygwin or Mac OS, but I don’t use these OS).
First step is the instalation of development tools:
1) Install gcc-arm-none-eabi package:
$ sudo apt-get install gcc-arm-none-eabi
2) Compile and install OpenOCD
Note: If your system doesn’t have the development tools and libraries then install these packages listed here: https://acassis.wordpress.com/2013/10/07/quais-pacotes-de-desenvolvimento-instalar-no-linux/
$ git clone http://repo.or.cz/r/openocd.git
$ cd openocd
$ ./bootstrap
$ ./configure --enable-internal-jimtcl --enable-maintainer-mode --disable-werror --disable-shared --enable-stlink --enable-jlink --enable-rlink --enable-vslink --enable-ti-icdi --enable-remote-bitbang --enable-usb-blaster --enable-presto --enable-osbdm

You will see it at end of this process:

libjaylink configuration summary:
 - Package version ................ 0.1.0
 - Library version ................ 0:0:0
 - Installation prefix ............ /usr/local
 - Building on .................... x86_64-pc-linux-gnu
 - Building for ................... x86_64-pc-linux-gnu


OpenOCD configuration summary
--------------------------------------------------
MPSSE mode of FTDI based devices        yes (auto)
Segger J-Link JTAG Programmer           yes
ST-Link JTAG Programmer                 yes
TI ICDI JTAG Programmer                 yes
Keil ULINK JTAG Programmer              yes (auto)
Altera USB-Blaster II Compatible        yes (auto)
Versaloon-Link JTAG Programmer          yes
OSBDM (JTAG only) Programmer            yes (auto)
eStick/opendous JTAG Programmer         yes (auto)
Andes JTAG Programmer                   yes (auto)
USBProg JTAG Programmer                 yes (auto)
Raisonance RLink JTAG Programmer        yes
Olimex ARM-JTAG-EW Programmer           yes (auto)
CMSIS-DAP Compliant Debugger            yes (auto)

Now compile and install it:

$ make
$ sudo make install
Now the next step is download and compiling NuttX:
1) Download the NuttX kernel and its applications:
$ mkdir NuttX
$ cd NuttX
$ git clone https://bitbucket.org/nuttx/nuttx
$ git clone https://bitbucket.org/nuttx/apps
$ git clone https://bitbucket.org/nuttx/tools
2) Compile the Kconfig Frontend needed by NuttX:
$ cd tools/kconfig-frontends
$ ./configure
$ make
$ sudo make install
3) Compile NuttX for stm32f103-minimum board:
$ cd ../..
$ cd nuttx/tools
$ ./configure.sh stm32f103-minimum/nsh
$ make menuconfig

Enter into "Build Setup" menu and confirm that "Build Host Platform" is defined to Linux
Enter in "System Type" -> "Toolchain Selection" and confirm that:
(X) Generic GNU EABI toolchain under Linux

Select <EXIT> and confirm to save everything.

Now you can compile it:

$ make

At end of compilation you will see:

make[2]: Leaving directory '/tmp/NuttX/nuttx/configs/stm32f103-minimum/src'
LD: nuttx
make[1]: Leaving directory '/tmp/NuttX/nuttx/arch/arm/src'
CP: nuttx.bin
3) Flashing the firmware nuttx.bin in the stm32f103-minimum board:
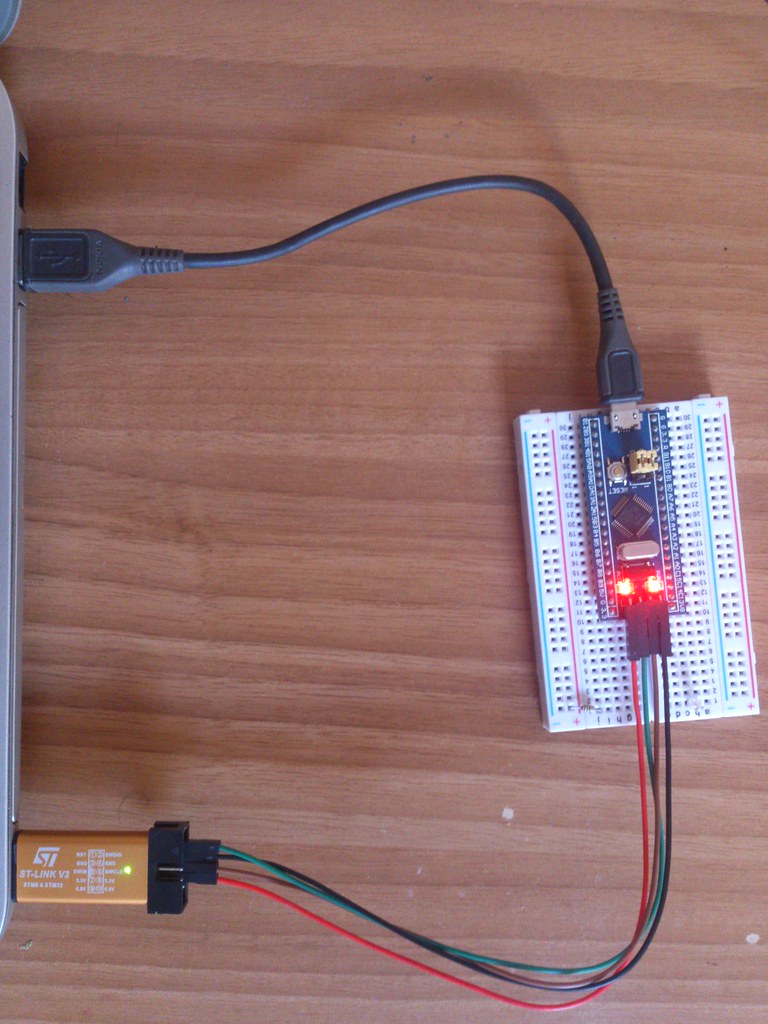
Connect the USB Cable and the STLinkV2 programmer to STM32F103 board this way:
Create a file openocd_stm32f1.cfg with this content:
# Using stlink as SWD programmer
source [find interface/stlink-v2.cfg]

# SWD as transport
transport select hla_swd

# Use STM32F103 target
set WORKAREASIZE 0x4000
source [find target/stm32f103c8t6.cfg]
Execute OpenOCD passing this configuration file:
$ sudo openocd -f openocd_stm32f1.cfg

Open On-Chip Debugger 0.10.0-dev-00300-g89bf96f-dirty (2016-05-20-17:42)
Licensed under GNU GPL v2
adapter speed: 1000 kHz
adapter_nsrst_delay: 100
none separate
Info : Unable to match requested speed 1000 kHz, using 950 kHz
Info : Unable to match requested speed 1000 kHz, using 950 kHz
Info : clock speed 950 kHz
Info : STLINK v2 JTAG v17 API v2 SWIM v4 VID 0x0483 PID 0x3748
Info : using stlink api v2
Info : Target voltage: 3.297181
Info : stm32f1x.cpu: hardware has 6 breakpoints, 4 watchpoints
Open a new shell terminal and execute:
$ telnet 127.0.0.1 4444
You will be presented with this message:
Trying 127.0.0.1...
Connected to 127.0.0.1.
Escape character is '^]'.
Open On-Chip Debugger
>
Now execute this command to store nuttx.bin in the stm32f103 flash memory:
> reset halt

stm32f1x.cpu: target state: halted
target halted due to debug-request, current mode: Thread
xPSR: 0x01000000 pc: 0x080003ac msp: 0x20000730

> flash write_image erase nuttx.bin 0x08000000

auto erase enabled
device id = 0x20036410
ignoring flash probed value, using configured bank size
flash size = 128kbytes
stm32f1x.cpu: target state: halted
target halted due to breakpoint, current mode: Thread
xPSR: 0x61000000 pc: 0x2000003a msp: 0x20000730
wrote 40960 bytes from file nuttx.bin in 2.384699s (16.774 KiB/s)
>
Finally all you need to do is to connect a USB/Serial and use a Serial Console as Minicom/Picocom/Screen to get access to NuttX terminal .
-------------------------------
|USB/Serial | STM32F103 Board |
-------------------------------
|   RXD     |       A9        |
|   TXD     |      A10        |
|   GND     |       G         |
-------------------------------

Configure Minicom or use your preferred serial program to 115200 8n1 with your USB/Serial adapter, i.e /dev/ttyUSB0. You will get this message after pressing the RESET button:
NuttShell (NSH)
nsh>

I don’t have the personal bandwidth to work on this anytime soon but, despite that, I ordered two of the boards for under $5 total, including shipping. Amazing! Thanks for the post.
Hi Celem,
This is a nice board you will no regret!
This STM32F103 microcontroller has 128KB, although the datasheet says it has 64KB.
I will try to develop more tutorials using this board. BR, Alan
Congratulations !! This a nice board with an excellent price tag .
I’m stuck at step #3 when I try to execute ‘make menuconfig’.
My system is a fresh installed debian testing with up to date packages from your list for development. The only difference is that I installed openocd through apt instead of installing and compiling it by source, is that a problem?
Anyway, after executing ./configure.sh stm32f103-minimum/nsh and make menuconfig i recieve this error:
make: *** No rule to make target ‘menuconfig’. Stop.
The same problem at the same point happened when I tried your workflow on a Linux Mint 17.2 environment.
Any idea what causes this problem?
Hi Adrian,
I think you are executing “make menuconfig” inside “nuttxspace/nuttx/tools/”, you should run it inside:
nuttxspace/nuttx/
Also, didn’t you compile and install the kconfig-frontends ? It is needed by “make menuconfig”
Hi Alan, thanks you were right! Now I can configure the build and compile it successfully. Following your build instructions it wasn’t clear for me to execute make menuconfig in nuttx/ instead of nuttx/tools/, but now it works like a charm 🙂
Thanks
Thanks for this tutorial. It’s amazing to be able to try real-time OS development under $2. I am looking forward to seeing more tutorials regarding this board.
Hi Masoud,
Also you can follow my tutorials in the youtube: https://www.youtube.com/playlist?list=PLd73yQk5Fd8JEsVD-lhwYRQKVu6glfDa8
Great tutorial!
Just to complement, you can also flash with openocd with a one liner(no need for telnet step):
openocd -f openocd_stm32f1.cfg -c “init” -c “reset init” -c “reset halt” -c “flash write_image erase nuttx.bin 0x08000000” -c “reset” -c “exit”
I had a problem with openocd_stm32f1.cfg, instead of targetting stm32f103c8t6 I replaced it with stm32f103c8_blue_pill.cfg, which i found while searching for stm32f103c8t6 in openocd directory. I was not able to find stm32f103c8t6.cfg anywhere but found a file named: stm32f103c8_blue_pill.cfg. I do not know the reason for the name change but it worked for me. Plus I replaced interface/stlink-v2.cfg with stlink.cfg.
My file looks like this:
########################################################################
# Using stlink as SWD programmer
source [find interface/stlink.cfg]
# SWD as transport
transport select hla_swd
# Use STM32F103 target
set WORKAREASIZE 0x4000
source [find board/stm32f103c8_blue_pill.cfg]
#######################################################################
Your work is totally dope, loved it, thank you for the documentation.
Hi Alan ,
After a long time after reading your great tutorial , I bought 4 Bluepills to experiment with the device but half of them arrived apparently bricked, failing to program. In order to solve it , I used the following commands to unlock and mass erase the devices on openocd terminal session:
> reset halt
> flash banks # identify available banks
> stm32f1x mass_erase 0
> stm32f1x unlock 0
After that, the devices were ready to be programmed.
Regards ,
Jeronimo
Very nice Jeronimo! Welcome aboard! Any issues, please let me know! BR, Alan
Hi Alan,
kconfig compiled OK, but throws an error at your step 3:
3) Compile NuttX for stm32f103-minimum board:
$ cd ../..
$ cd nuttx/tools
$ ./configure.sh stm32f103-minimum/nsh
root@dev:/home/devusr/NuttX/nuttx/tools# ./configure.sh stm32f103-minimum/nsh
Copy files
Refreshing…
/home/devusr/NuttX/apps/system/psmq/Kconfig:9:error: recursive dependency detected!
For a resolution refer to Documentation/kbuild/kconfig-language.txt
subsection “Kconfig recursive dependency limitations”
/home/devusr/NuttX/apps/system/psmq/Kconfig:9: symbol SYSTEM_PSMQ depends on SYSTEM_EMBEDLOG
For a resolution refer to Documentation/kbuild/kconfig-language.txt
subsection “Kconfig recursive dependency limitations”
/home/devusr/NuttX/apps/system/embedlog/Kconfig:6: symbol SYSTEM_EMBEDLOG is selected by SYSTEM_PSMQ
I have no knowledge of kconfig, do you see what goes wrong here?
Pete.
Hi Peter,
You cloned the apps/ at the moment someone introduced a bad commit.
You can fix it this way:
cd nuttx
make distclean
cd ../apps
git pull
cd –
./tools/configure.sh stm32f103-minimum/nsh
make menuconfig
make
BR,
Alan
OK, thanks that worked… partly. The ./configure now runs without error, but I seem to be missing a makefile or a symlink. I work from inside a Vbox VM on a shared drive containing the git files. Maybe that virtual drive is the problem. Anyway I’m still stuck, do you have any other suggestions?
devusr@dev:~/NuttX$ make distclean
make: *** No rule to make target ‘distclean’. Stop.
devusr@dev:~/NuttX/nuttx/tools$ make menuconfig
make: *** No rule to make target ‘menuconfig’. Stop.
Hi Peter,
You are running the commands at wrong place.
The “make menuconfig” and “make” should run at root of nuttx/ directory, in your case inside ~/NuttX/nuttx/
You ran it inside ~/NuttX/ and inside ~/NuttX/nuttx/tools that will not work.
Oops, disregard the above comment. I was in the wrong directory.
Hi Alan,
Great article thanks. It’s amazing that we live in a world where the cost of developing embedded systems is pretty much zero and everyone can have a go.
Is there any interesting projects you have in mind for nuttx and the pill board?
where do we have to create the openocd_stm32f1.cfg file?
When I give the command
“openocd -f openocd_stm32f1.cfg”
I am getting error
“embedded:startup.tcl.26: Error: Can’t find openocd_stm32f1.cfg”
HI Alan, I have a question about using gpio in Nuttx, I hope you don’t mind me asking.
In order to use other pins (other than the ones used in gpio example), should I add more pins to g_gpioinputs array in boards/arm/stm32/stm32f103-minimum/src/stm32_gpio.c? or is there a better way to do it?
Thanks for all your great works
Hi Raz, you need to add the new pin definition at src/stm32f103_minimum.h and also update the number of GPIO Inputs or Outputs or Interrupt Inputs. Spend some time looking the src/stm32_gpio.c to understand how it works. BR, Alan
Thanks Alan for your reply. So, if I wanted to write an application that works with a few GPIO pins, then I would have to modify the kernel code as well? Then when I release the application code I would have to release a patch to the kernel too? Maybe it would be a good idea to have something like Linux’s device tree supported by Nuttx in the future?